Perfect Cream Cheese Mints Every Time: Tips & Tricks
There's a certain magic to easy cream cheese mints. These delightful, melt-in-your-mouth confections are more than just a sweet treat; they're a cherished tradition, a staple at holiday gatherings, and a surprisingly simple way to impress guests. Their creamy texture, vibrant colors, and refreshing flavor make them utterly irresistible. But while the basic concept is straightforward, achieving truly perfect cream cheese mints every time can feel like a delicate art. From getting the ideal consistency to ensuring even flavoring and stunning presentation, there are nuances that can elevate your homemade mints from good to absolutely unforgettable.
Whether you're a seasoned baker looking to refine your technique or a beginner eager to master this classic, this comprehensive guide is packed with expert tips, clever tricks, and practical advice to help you craft the most exquisite cream cheese mints. Get ready to unlock the secrets to perfect texture, vibrant hues, and irresistible flavor that will have everyone asking for your recipe!
The Foundation of Flavor: Mastering the Basic Cream Cheese Mints Recipe
At the heart of every perfect batch of cream cheese mints lies a solid foundational recipe. While variations exist, the core ingredients remain consistent: full-fat cream cheese, unsalted butter, confectioners' sugar (also known as powdered sugar), and your chosen extract. Each component plays a vital role in achieving that signature creamy texture and balanced sweetness.
- Quality Ingredients Matter: Start with high-quality, full-fat block cream cheese (not the spreadable kind in a tub) and fresh unsalted butter. These dairy products form the creamy base, and their quality directly impacts the final taste and texture of your mints.
- Temperature is Key: Ensure both your cream cheese and butter are softened to room temperature. This is perhaps one of the most crucial steps. Cold ingredients will result in a lumpy, inconsistent mixture that's hard to work with and can lead to overmixing. Softened ingredients, however, blend smoothly and incorporate the confectioners' sugar effortlessly, creating a velvety dough.
- Gradual Sugar Addition: Don't dump all the confectioners' sugar in at once. Add it gradually, mixing well after each addition. This prevents a powdery cloud and allows you to adjust the consistency as you go. The amount of sugar can vary slightly depending on the humidity and the precise moisture content of your cream cheese and butter.
- The Role of Extract: Peppermint extract is traditional for cream cheese mints, but don't be afraid to experiment with other flavors like vanilla, almond, or even lemon. Use a good quality extract for the best flavor. Start with the recommended amount and add more to taste if desired, but remember extracts are potent!
For a detailed step-by-step walkthrough of a reliable basic recipe, be sure to check out our guide on Easy Cream Cheese Mints: Your Go-To No-Bake Treat. It provides an excellent starting point for any aspiring cream cheese mints maker.
Troubleshooting Common Cream Cheese Mints Challenges
Even with the best intentions, things can sometimes go awry. Don't despair! Most common issues with cream cheese mints are easily fixable with a few clever adjustments.
Too Sticky or Too Crumbly? The Perfect Consistency
- If your mixture is too sticky: This is usually a sign that you need more confectioners' sugar. Add it a tablespoon at a time, mixing thoroughly until the dough is firm enough to handle without sticking excessively to your hands. Chilling the dough can also help firm it up.
- If your mixture is too crumbly: This often means there isn't enough moisture or fat. You can add a tiny bit more softened butter or, for a richer flavor, a small amount of heavy cream (1/4 teaspoon at a time) or even a few drops of milk. Be very cautious, as too much liquid will make it sticky. Sometimes, simply kneading it more with warm hands can help bring it together.
- The Finger Test: The ideal consistency should feel like Play-Doh – pliable, smooth, and easy to shape, without leaving excessive residue on your fingers.
Uneven Color and Flavor Distribution
Have you ever had a batch of cream cheese mints with pale streaks or a patchy flavor? Here's how to avoid that:
- Coloring Techniques: For vibrant, consistent color, always add food coloring to the softened cream cheese and butter before you add the confectioners' sugar. This allows the color to disperse evenly through the fat. Gel food colorings are highly recommended over liquid drops as they are more concentrated, produce richer colors, and won't add excess moisture to your dough. Add a tiny bit at a time, mixing thoroughly, until you achieve your desired hue.
- Flavor Integration: Add extracts at the same time as your food coloring for best results. Ensure you mix the dough thoroughly with a stand mixer, hand mixer, or by hand until the color and flavor are uniformly distributed.
Mints That Don't Hold Their Shape
Nothing is more disappointing than beautifully shaped cream cheese mints that lose their form. The key here is proper chilling.
- Pre-Shaping Chill: After mixing your dough, wrap it tightly in plastic wrap and refrigerate it for at least 30 minutes to an hour. This firms up the butter and cream cheese, making the dough much easier to handle and less prone to sticking or melting during shaping.
- Post-Shaping Chill: Once your mints are shaped, arrange them on a parchment-lined baking sheet and return them to the refrigerator for another 1-2 hours, or even overnight. This final chill is crucial for setting their shape and preventing them from becoming too soft at room temperature.
- Working in Batches: If you're making a large batch, keep portions of the dough in the refrigerator while you work with another portion. This prevents the dough from becoming too warm and sticky.
Elevating Your Cream Cheese Mints: Creative Customization & Presentation
Once you've mastered the basics, the world of customization opens up! Cream cheese mints are incredibly versatile, offering endless possibilities for unique flavors, stunning colors, and eye-catching designs.
Flavor Variations Beyond Peppermint
While peppermint is classic, don't limit yourself! Think about the season or occasion when choosing your flavors:
- Fruity & Zesty: Lemon, orange, or lime extracts add a refreshing tang.
- Warm & Cozy: Almond, vanilla, maple, or even a touch of rum extract can create a delightful warmth.
- Spiced: Consider a hint of cinnamon or gingerbread extract for holiday-themed mints.
- Beverage-Inspired: Root beer or coffee extracts can offer a unique twist.
You can also combine flavors, such as lemon-lavender or orange-vanilla, for a truly gourmet experience. Always taste a tiny bit of the dough (before shaping) to adjust the flavor profile.
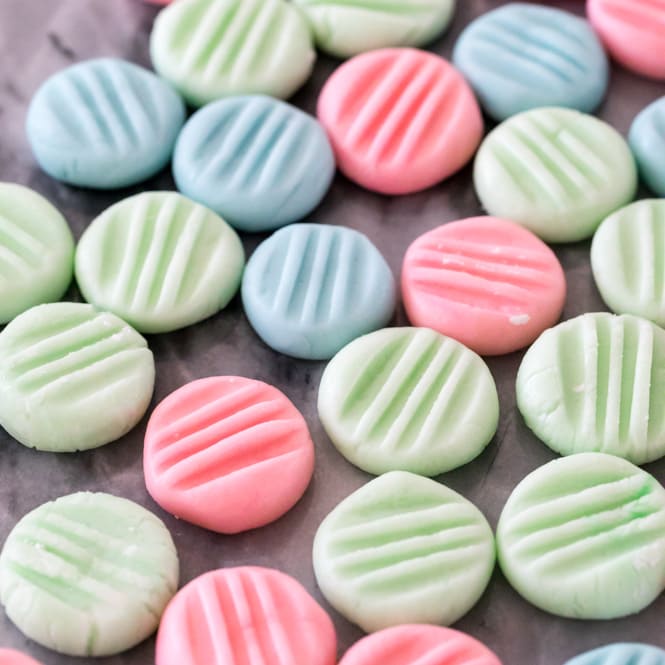
A Spectrum of Colors: Making Your Mints Visually Stunning
Color is where cream cheese mints truly shine!
- Gel Food Coloring is Your Best Friend: As mentioned, gel colors offer intense, vibrant hues without thinning your dough. A tiny dab on a toothpick goes a long way.
- Marbling Magic: For an elegant look, divide your dough into two or three portions and color each a different complementary color (e.g., pink and white, blue and white, green and white). Gently twist the colored portions together a few times – don't overmix! – then shape. The subtle swirl will create a beautiful marbled effect.
- Ombre Effect: Divide your dough and color each portion a progressively darker shade of the same color for a gradient effect when presented together.
- Holiday Hues: Embrace seasonal colors! Red and green for Christmas, pastels for Easter, orange and black for Halloween, or patriotic red, white, and blue for summer celebrations. Learn more about why these treats are perfect for festive occasions in our article: Why Cream Cheese Mints Are the Ultimate Holiday Treat.
Shaping & Decorating for Impact
This is where your creativity can really take center stage!
- Silicone Molds: These are a game-changer for uniform, intricate shapes. Flower molds, leaf molds, tiny animal molds, or specific holiday shapes (pumpkins, snowflakes, hearts) work beautifully. Lightly dust molds with confectioners' sugar before pressing in the dough for easy release.
- Fork Press: The traditional method involves rolling small balls of dough and pressing them with a fork for a classic ridged pattern. Dip the fork in confectioners' sugar between presses to prevent sticking.
- Hand Rolling: For a simple, rustic look, hand-roll the dough into small balls or cylinders.
- Texturizing Mats: Similar to molds, these can create beautiful patterns on the surface of your mints.
- Sugar Coatings: Before or after shaping, you can lightly roll your cream cheese mints in granulated sugar, sparkling sanding sugar, or even flavored sugars for an extra textural and visual appeal.
Storage and Shelf-Life: Keeping Your Cream Cheese Mints Fresh
Once you've put in the effort to create perfect cream cheese mints, you'll want to ensure they stay fresh and delicious for as long as possible.
- Refrigeration is Key: Because they contain cream cheese and butter, these mints are perishable and must be stored in the refrigerator. Place them in an airtight container, ideally between layers of parchment paper, to prevent them from sticking together or absorbing odors from other foods.
- Shelf Life: Properly stored in the refrigerator, cream cheese mints typically last for 1-2 weeks. Their quality is best within the first week.
- Freezing for Longer Storage: Cream cheese mints freeze exceptionally well! Arrange shaped and chilled mints in a single layer on a parchment-lined baking sheet and freeze until solid (about 1-2 hours). Once frozen, transfer them to an airtight freezer-safe container or bag, again with parchment paper between layers to prevent sticking. They can be frozen for up to 2-3 months. Thaw them in the refrigerator before serving.
- Gifting Tips: If you're making these for gifts, ensure they are kept cool. Package them in attractive, airtight containers. Include a note to advise the recipient to refrigerate the mints.
Crafting perfect cream cheese mints is a rewarding endeavor that brings joy to both the baker and those lucky enough to taste them. By focusing on quality ingredients, understanding consistency, and embracing creative customization, you can consistently produce these delightful confections with confidence. Whether you stick to the classic peppermint or venture into new flavor and color combinations, the tips and tricks shared here will empower you to create mints that are not just treats, but true edible works of art. So, go ahead, get creative, and enjoy the delicious process of making perfect cream cheese mints every single time!
